Perfect brows can transform your entire look—but for many women, achieving balanced, natural arches every day feels frustrating and time-consuming. Uneven shapes, sparse areas, and mismatched shades often lead to overfilling or starting over completely.
The Madluvv Brow Stamp Kit was created to simplify that process. Instead of spending 10–20 minutes drawing and correcting, this stencil-and-stamp system helps you create symmetrical, fuller-looking brows in just a few steps.
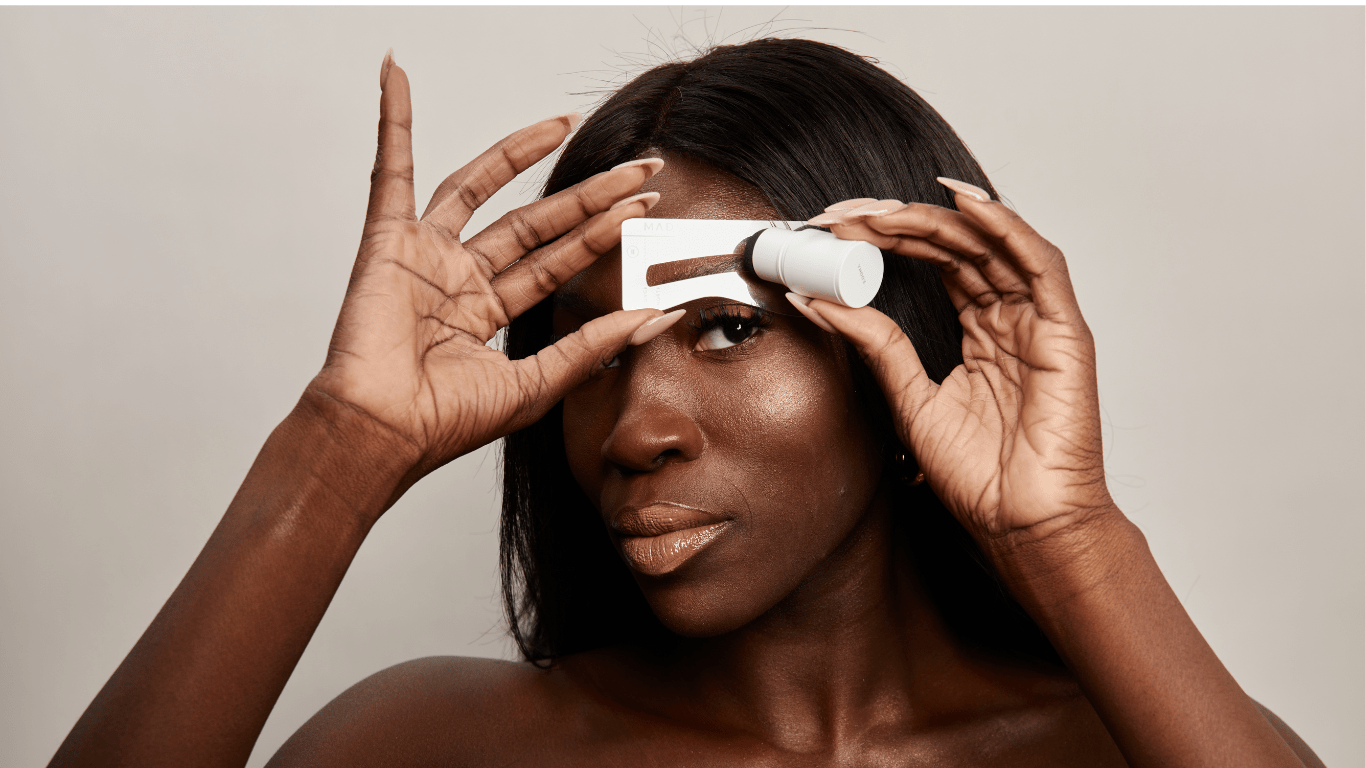
What Is the Madluvv Brow Stamp Kit?

The Madluvv Brow Stamp Kit is a beginner-friendly brow system designed to create consistent shape and definition quickly. The kit typically includes:
A highly pigmented brow stamp
Multiple reusable brow stencils
A dual-ended brush for blending and shaping
The stencil acts as your guide, helping eliminate guesswork when shaping. The stamp delivers even, buildable color, while the brush softens and refines the final look.
Why Use a Brow Stamp Instead of a Pencil?
1. Built-In Symmetry
One of the most common brow challenges is achieving even arches. A stencil helps create balanced shape from brow to brow, especially helpful for beginners or those with sparse tails.
2. Faster Application
Traditional brow routines may involve outlining, filling, blending, and correcting. A brow stamp reduces this to stamp, blend, and refine—making it ideal for busy mornings.
3. Soft, Natural-Looking Finish
The formula is designed to be buildable. A light press creates a subtle daytime look, while layering adds more definition for evenings or events.
3. Soft, Natural-Looking Finish
One of the most common brow challenges is achieving even arches. A stencil helps create balanced shape from brow to brow, especially helpful for beginners or those with sparse tails.
4. Long-Lasting Wear
Smudge-resistant formulas help maintain definition throughout the day, even in humidity or long work hours.

Step-by-Step: How to Use the Madluvv Brow Stamp for Natural Results
Step 1: Choose Your Stencil
Select the stencil shape that best matches your natural arch. Align it with your brow bone and hold firmly in place.
Step 2: Lightly Tap the Stamp
Press the stamp into the powder and tap off excess. Apply using gentle pressing motions rather than dragging.
Step 3: Blend and Soften
Use the spoolie end of the brush to soften the inner brow area. Blend upward at the front to create a gradient effect that mimics natural hair growth.
Step 4: Repeat on the Other Brow
Flip the stencil and repeat. Finish by refining edges lightly if needed.
Tips to Make Brow Stamp Results Look Even More Natural
Avoid over saturating the stencil with product
Focus slightly more pigment on the tail than the front
Blend upward at the front of the brow for a feathered look
Set with a clear brow gel if desired for added hold
These small adjustments help ensure brows look defined but not stamped-on.

Who Is the Madluvv Brow Stamp Best For?
The brow stamp system is especially helpful for:
Beginners who struggle with shaping
Women with sparse or thinning brows
Busy professionals needing quick application
Anyone wanting a consistent everyday brow routine
For those who prefer structure and ease over intricate pencil techniques, this system offers a streamlined alternative.
Simplifying Your Brow Routine
Defined brows frame the face and create a polished appearance—even with minimal makeup. A stencil-based system like the Madluvv Brow Stamp Kit removes the most frustrating parts of brow application: uneven arches, inconsistent shape, and time-consuming corrections.
With the right shade and light blending, the result can look soft, balanced, and natural—without requiring advanced makeup skills.


