Make 2022 your year by looking and feeling your best. And it all starts with the perfect eyebrows.
This blog will teach you the latest trend on how to do the quickest and easiest eyebrow makeup of 2022.
With each step, you’ll be able to make yourself look your best all year round, leaving a beautiful impression wherever you go.
Let’s start.
The technique you will learn here is called the polished feather brow.
With this technique, you essentially create hair strokes along your brow where there are none.
But before going to the primary steps, here are a few tips you need to know.
Tip No. 1: Ensure balanced proportions.

One thing to remember is that to maintain a perfect balance, your brows should line up with the side of your nostrils. They should not line up with your nose tip. When you line them up with the tip of your nose, they will look great at a few angles, but not all.
But of course, each face is uniquely beautiful, and you have to make minor adjustments to make things perfectly balanced. Sometimes you need to add more hairs on a side to get them to look even.
But don’t forget that the best way is to align your brows to your nostrils. Also, your brows have to end at the outer edges of your eyes.
Tip No. 2: Study your pictures.
Another tip is to plan ahead. If you are doing someone else’s makeup, it would be best to ask for their photos at least a day before so you can study their face, and figure out what brow makeup has worked and not worked for them.
If you are doing your own, look back at your pictures so you can have a good idea of what is perfect for you. This will truly help you figure out the most flattering technique, shape, and color for your brows.
Looking at your old and recent photos side-by-side will allow you to decide which look is best for you.
Another tip is that if you're having trouble with a particular part of your brow or technique, record a video. Then, watch it back to discover where you've gone wrong or where your brows have become too thin or sparse to fill in.
Tip No. 3: Groom your brows.
Another tip is that you have to groom your brows at least once or twice a week. Ensure to clean up all of the hairs around your brows regularly.
This surprisingly provides a significant advantage. When the areas you need cleaning up are appropriately maintained, you’ll effectively lessen the work and product you need in order to get a crisp and clean-looking brow.
Pro tip: If you have ungroomed brows, brush up your brow hair with a spoolie or brow brush, then trim the excess hair so that your brows look immaculate when you put them back in place.
Tip No. 4: Use eye primer and powder.
If you use plenty of moisturizing or hydrating products, it may make the pomade smudge.
To keep your eyebrows in place, use your eyeshadow primer over your lid and bring it up into your brows. Also, brushing a little powder over your brows can give your products extra longevity.
Tip No. 5: Use glycerin brow gel.
Instead of soap, use glycerin brow gel for soap brows. Full soap brows can make your eyebrows look fabulous, but they can fall back into place more frequently and become a little bit messy when you don’t use a brow gel with glycerin.
Tip No. 6: Use a thin brow brush.
Use a very thin brush. This will ensure that each pomade stroke you do looks like an actual brow hair.
Tip No. 7: Match the correct brow color.
Ensure to match your brow product to the shade of your natural brow. Remember that the shade you choose should certainly be the same undertone as the hairs of your brows.
So if your brows have a cooler undertone, you would want to use a cooler shade brow product. And your pomade should certainly blend perfectly with your brows.
Tip No. 8: Put pomade on cap for dipping.
One excellent tip is to put plenty of pomade on the top of its container cap. Then simply wipe your brush off until you have the perfect amount of pomade on your brush.
This can get you anywhere from 4-10 small brow strokes before you would have to go dip back in.
Tip No. 9: Create ¼-in marks.
Realistic-appearing brow strokes are sized under 1/4in.
Tip No. 10: Save time with a brow stamp.
A brow stamp set can significantly save your time and energy when you are on the go and don’t have time to do detailed eyebrow makeup.
Use a product like Madluvv’s Eye Brow Stamp™ and Shaping Kit.
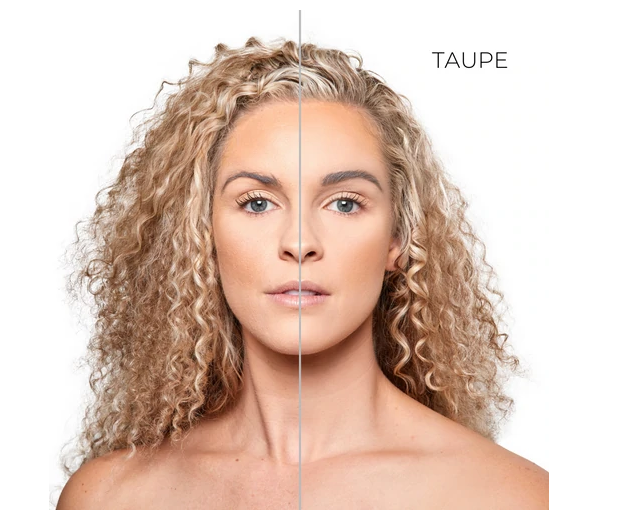
With this product, all you need to do is take a brow stamp quiz so you can ensure that the one you’re picking matches your brow and skin color. Then, place your order, receive your delivery, and quickly have perfect eyebrows anytime, anywhere.

When you run out, you can simply get a refill.
This is your most straightforward and most convenient way of ensuring perfect eyebrows all year in 2022.
Now, let’s dive into the main steps to create your ideal brow.
Step 1: Fill sparse areas.
Fill in your brow’s sparse areas. When you do so, you’ll also find that you would have to use less product.
Step 2: Draw a thin line under the arch.
Go underneath the brow and make a significantly thin line to polish the look. Remember to only use light pressure.
This step significantly helps pull the brow together. It can also give you a more polished, streamlined appearance.
Step 3: Draw brow strokes following your natural brow hairs’ direction.
The next step is to brush your brow hair down. And if you find the need to, you can add a few more strokes down towards your ear while going in the same direction as to how your brow hairs grow.
Step 4: Draw upward strokes on your front brow.
Fill in the front brow a little bit using upward strokes. With this, you can line up the start of your brows with the sides of your nostril.
One common mistake to look out for in this step is not to apply too much pressure. Doing so will make your brow strokes come up too high, making the brow appear a bit boxy.
By this stage, you’ll see why it is important to first fill in the sparse areas using a brow pomade that matches your brow hairs.
Step 5: Add warm tones if needed.
Go back in with a warmer brow gel that matches your hair. Remember that you only have to do this if your hair’s shade is warmer or cooler than your brows.
Very lightly add that warmth back in on the top of my brows.
Step 6: Clean up the brow edges.
Clean up the edges of your brows using a lighter shade. You can use a brow highlighter pencil or a flat brush and concealer to do so.
Remember that the flat brush is significantly vital for this step. And the best thing about that is that flat brushes are incredibly affordable.
Using the side of the brush, not the top but the thinner side, clean up over and under your brow and create a pleasant and crisp edge. With this, you won’t have to use any more of your darker pomade.
This keeps the overall appearance of your brows lighter.
At this point, if you are not yet with the front of your brow, you can go in with extra highlighter. This way, you can try to make the brow front look a little smaller.
Step 7: Balance your brows.
After finishing all the steps on both of your brows, make your own minor adjustments to ensure that they are balanced and have the same natural look.
Step 8: Use a setting spray.
The last step is about making your brows last. And to do this, use a setting spray.
Get your brows on fleek.
Now that you know the tips and tricks to create your perfect brow makeup, you can enter 2022 with a gorgeous and fabulous you.
And don’t forget to have a product that’s ready for you anytime you’re on-the-go
Madluvv’s Brow Stamp™ Set will ensure that you look your best in a convenient and straightforward way.
Take the brow stamp quiz now for the perfect product for you.


